ZOOM SETTINGS FOR WEBINAR USE (SINGLE-SPEAKER)
KU licenses Zoom for its Faculty, Staff, and GTA users, to accommodate instructional online uses. Zoom Pro Licensing, when provisioned, provides KU-approved users with unlimited number of meeting rooms, with no duration limits, and a capacity of 300 users for each meeting.
Many of our users have inquired about Webinars – a different Zoom product. While Zoom meetings are, by default, designed to be collaborative spaces, where users can share their voice, likeness, and content – just like a real meeting – there are often cases where you’d like to present as a single-speaker, with less open microphones and discussion. And with questions and comments handled over the chat window.
Zoom Webinars have some additional features, including meeting capacity size, registration controls, and branding. KU IT has limited Webinar licensing. You can contact the Media Production Studio (itmps@ku.edu) for more information.
You can, though, set up your Zoom meeting with some specific settings to best simulate a webinar. If you need to register attendees, you can do that. And you can modify settings to make it more suitable for 1-way presentations from speakers and panelists, where attendees can communicate questions via chat. And using controls to restrict mics, cameras, annotation, etc.
Listed below are some Zoom meeting modifications you can make, to best use your meeting room as a Webinar:
 Registration
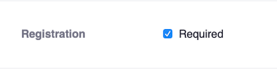
When you create a meeting, you can choose to require registration. Registration will create a “Registration URL” for your meeting. When that link is clicked, users will be asked for the information that you’d like to gather (Name, email, etc), click submit, and then be given the URL for the meeting.
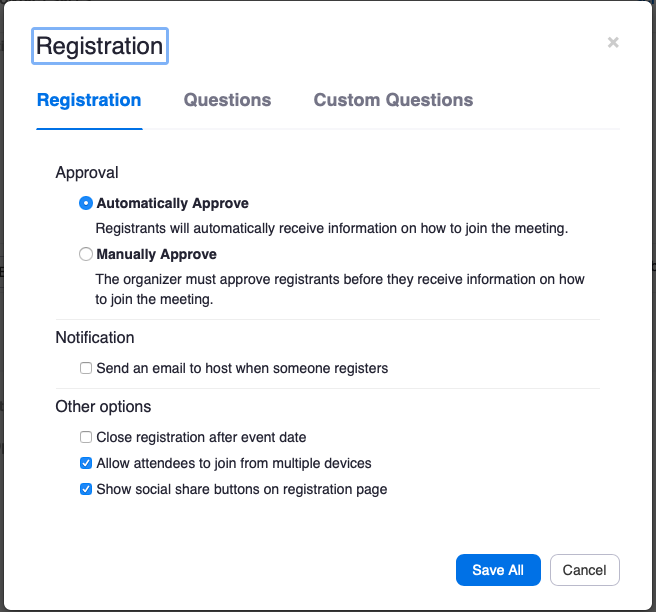
The meeting host can receive notifications of new registrants. And registrants will receive an email confirmation. And a list of registrants will be collected in the Zoom portal.
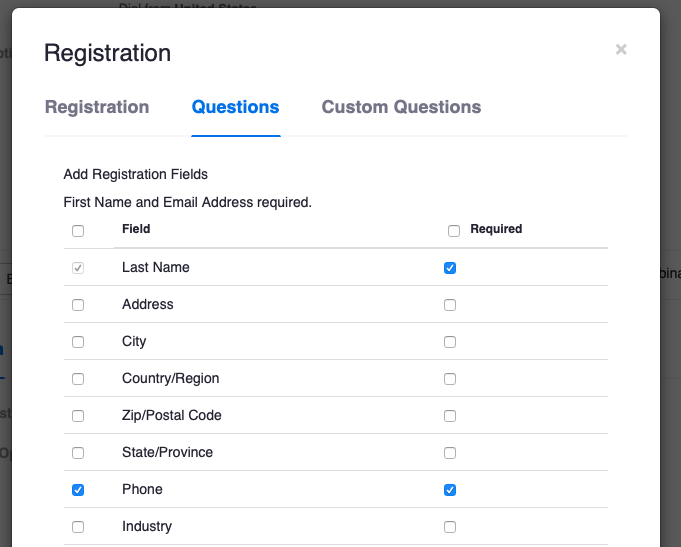
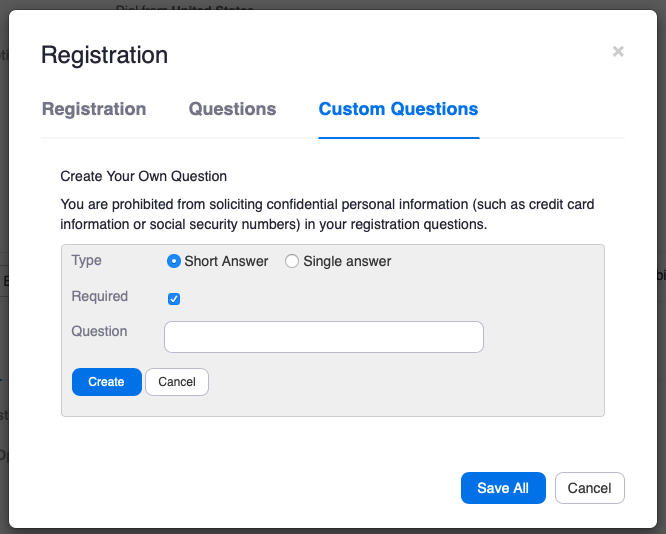
After saving a meeting, you can then make the adjustments in registration settings. You can choose the questions, for the information you’d like to gather, including creating custom questions.
Restrict Microphones
Most often during a single-speaker or panel scenario, you’d like to restrict the use of attendees’ microphones. In the meeting, you can Mute All (and Unmute All) manually. To restrict for the length of the meeting, follow the in-meeting steps below:
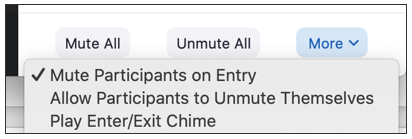
- Select the Manage Participants button in the Zoom toolbar.
- At the bottom of the Participants window, select More.
- Choose Mute Participants on Entry.
- Deselect Allow Participants to Unmute Themselves.Restrict Webcams
Restrict Webcams
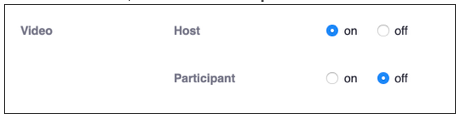
The easiest way to prevent attendees from sharing their webcams is to manage that setting when scheduling your meeting.
- Go to http://kansas.zoom.us
- Click on Schedule Meeting.
- Under Video section, select off for Participant radio button.

If you need to restrict camera access in-meeting, you can do that by participant.
- Click on Manage Participants in Zoom toolbar.
- Choose More button next to participant's name, and select Stop Video. This will remove their camera stream and they will be unable to restart their video.


Restrict Content Sharing
Your Zoom In-Meeting settings, at the account level, are set to not allow all participants to share, without permission from the host. Only hosts and co-hosts can share content.
In a meeting, you can change this setting, to let your participants use the Screen Sharing:
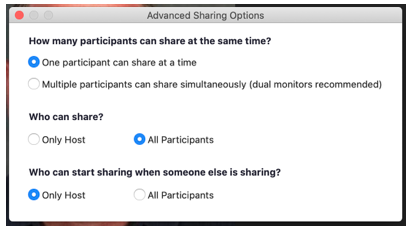
- In the Zoom toolbar, select the carat next to Share Screen.
- In the Advanced Sharing Options window, make these adjustments:
- How many participants can share at the same time?
- Select One participant can share at a time.
- Who can share?
- You can change to Only Host from All Participants.

- You can change to Only Host from All Participants.
- How many participants can share at the same time?
Restrict Annotation
Annotation can be useful when screen sharing or working collaboratively on a Zoom Whiteboard. When turned on, it is available to all participants, by default.
Use these in-meeting steps to dictate who can annotate on shared content:
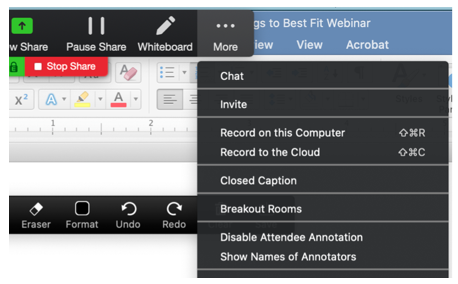
- When content or whiteboard is being shared, click on the More button in the Zoom toolbar.
- Select Disable Attendee Annotation, which will only allow the Host to use annotation tool.
If you’d like to leave that function on for participants, you can instead use Show Names of Annotators, in order to attribute annotations to specific users.
Modify Chat
In an Webinar, you can use a chat window for different purposes. You can assign someone to moderate the chat window, and use it for a stream of questions, comments, and back-channel conversations. Or you can close it more for only Q&A, and have questions submitted to host and co-hosts only.
- Click on the Chat button in the Zoom toolbar.
- Click on the … button at the bottom of the Chat window.

- Leave as Everyone publicly, to encourage chat conversation during the presentation. (Note: chat can be disabled, but chat messages can not be deleted.)
- Change Host only to restrict chat input by attendees as visible only to hosts and co-hosts. (Good for Q&A.)
- Change to No one to have no active chat.

Zoom Security Recommendations
Hosting an event using a Zoom meeting requires a certain amount of diligence, to make sure none of your participants are able to be disruptive or abusive to others. Here are some general suggestions for your Zoom meeting:
- If you need to make sure you know who is participating in your meeting, consider using Registration (instructions above) or the Waiting Room (instructions) features in Zoom.
- Don't distribute your Meeting Passcode to public sites or social media accounts.
- During the meeting, use the Security icon on the main (bottom) menu. It's the best place to quickly remove or restrict privileges of a disruptive participant. You can also Lock the meeting room - like a real-life meeting room door, restricting entrance to any new participants, like someone you just removed.
- Mute Participants - at the bottom of the Participants panel is a "Mute All" button. A quick button to push, to take mic sharing away from all participants. Even if disruptions are unintentional, like someone simply forgetting their mic is on, you can mute the entire room or an individual participant (hover over name).
- Use a co-host to help. Running a class or event over Zoom can require a lot of attention. You might want to have a trusted participant help you manage the controls above, or moderate the chat to gather questions and comments. A meeting host can hover over any participants name in the Participants panel, to elevate their role to co-host.